Host File for Web Development
Our goal
We’re going to edit the hosts file on our PC to make our servers IP address (e.g. 174.120.31.21) resolve to rockyrasonable.com, just like what a DNS server does when example.com’s name servers have been changed to point to the new hosting.
Configuring the server
All server configurations are different but the principle is generally the same, we need to find out/set our example.com to appear in the web browser when we visit our example IP of 174.120.31.219. For this example I’m going to explain the process on a Cpanel driven server (from this you should be able to get an idea of how this would be achieved through other management software packages).
- Configure your web space for rockyrasonable.com and upload all your files to it
- Login to Cpanel
- Select Server from the left-hand menu
- Go to the IP Addresses – This should present you with a list of IP addresses assigned to your server, when you configured the hosting for example.com you will have selected one of these IP addresses (you may even only have one IP address in this list)
- For each IP address there’s a column titled Hosting with a link showing the number of domains assigned to that IP address, click the link that corresponds with the IP address you selected for the web space
- Select rockyrasonable.com and click Set As Default – You can only select one default domain to be displayed if you visit that IP address in a browser
- Make a note of the IP address (e.g. 174.120.31.219)
- Visit 174.120.31.219 in a web browser – You should be presented with your newly uploaded site for rockyrasonable.com
PC’s have a hosts file that we can edit to make 174.120.31.219 resolve to rockyrasonable.com just as if the name servers for rockyrasonable.com had already been changed.
- Open the hosts file
- Edit and save the hosts file
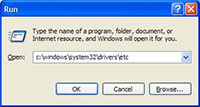
- Go to the Start menu and choose Run. Type the following in the Run dialog box:
- For Windows NT and Windows 2000
- C:\winnt\system32\drivers\etc
- Windows XP, Windows Vista or Windows 7
- C:\Windows\System32\drivers\etc
- For Windows NT and Windows 2000
- Click the OK button (This should open a window with several files in it.)
- Find the file called ‘hosts’ and double–click it. If prompted, specify that you would like to choose a program to open the file with from a list of programs.
- Choose ‘Notepad’ from the list of available programs.
- Start typing on a new line at the bottom of the file.
- To do so, place your cursor at the very end of the last line and hit ‘Enter’ to start a new line.
- Type these two lines of text like this example:
(use your server IP address and your site domain in–place of the defaults below)
[code]174.120.31.219 rockyrasonable.com[/code][code]174.120.31.219 www.rockyrasonable.com
[/code] - Close the hosts file and save it when prompted.
PLEASE NOTE: At this point you should be able to view and publish to your web site using your domain name. After 3–4 days, you will want to undo this change to your hosts file so that you can check to see that your domain name is now resolving without assistance over the internet.
- Undo the Hosts file change (after you have confirmed that it is resolving properly)
- Open the hosts file as described above.
- Delete the information that you added previously and close the file.
- Choose to save the changes to the hosts file when asked.


I genuinely like your innovative angle that you have on the topic. Certainly wasn’t planning on this at the time I begun browsing for tips. Your ideas were totally simple to understand, so I pondered precisely why I hardly investigated at this in the past. Happy to find out that there’s an individual online that obviously understands exactly what she is talking about. Exceptional piece of work
This is one of the most honest blogs I have ever read. Nothing overcomes good first hand experience on topics. Thank you for being sincere about this.
Fantastic information with regard to upload files for having myself personally begin. I am going to keep this particular website link and return to this.